Solfege UI Blogger Template
Solfege UI is the BIGGEST Forum Theme ever made on Blogger, 2 DIFFERENT theme Layouts with the same content box that allows you to create p...
|


Preview Buy Now Rs500 VegaMovies Blogger Template is a powerful and versatile blogspot movies theme perfect for creating ...

If you are looking for a free anime blogger templates to create a streaming anime website, the KumaStream blogger template is a great opt...

Zikanimehub is a fully responsive premium anime blogger template that is designed for anime movie and video download websites. The Blogge...

HDWatch4u Movie Blogger Templates are specially designed for movies, dramas, and online TV or streaming websites. These templates cater t...
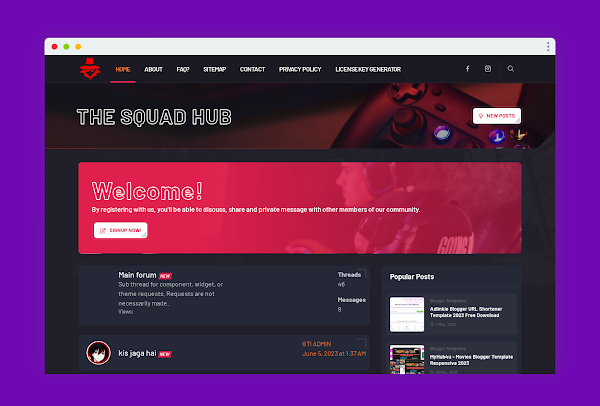
Thesquadhub is a website that offers a variety of premium Blogger templates for free download. One of their most popular templates is ...
.png)
TollyFlix is a Premium Paid, responsive Blogger template that is perfect for creating a website to showcase your favorite...

Movisrc Blogger Template 2023 Movies Blogger Template Introduction: Are you a movie lover with a burning desire to share your thoughts, revi...

Preview Buy Now Rs500 7Movies4k Blogger Template is a powerful and versatile blogspot movies theme perfect for creati...

Solfege UI is the BIGGEST Forum Theme ever made on Blogger, 2 DIFFERENT theme Layouts with the same content box that allows you to create p...

PsyPlay is a WordPress theme designed specifically for movies and TV series websites. It is based on the design of popular streaming sites ...


In today's digital age, having strong and secure passwords is crucial for protecting our online accounts. Creating complex passwords manually can be challenging, but fortunately, we can develop a password generator using HTML, CSS, and JavaScript to automate the process. In this article, we'll guide you through the steps of building a password generator on Blogger.
In this article I will teach you how to create a password generator tool app on Blogger or also give code
Dubble Click To Copy Code
<link href="https://fonts.googleapis.com/css?family=Montserrat&display=swap" rel="stylesheet"/>
<style>
* {
margin: 0;
padding: 0;
box-sizing: border-box;
}
.pagebody {
width: 100%;
background-image: linear-gradient(to top, #df204d 100%, #f67938 200%);
display: flex;
justify-content: center;
align-items: center;
}
button {
border: 0;
outline: 0;
}
.contr {
margin: 40px 0;
width: 400px;
height: 600px;
padding: 10px 25px;
background: #0a0e31;
border-radius: 10px;
box-shadow: 0 0 5px rgba(0, 0, 0, 0.45), 0 4px 8px rgba(0, 0, 0, 0.35), 0 8px 12px rgba(0, 0, 0, 0.15);
font-family: "Montserrat";
}
button {
border: 0;
outline: 0;
}
.result {
position: relative;
width: 100%;
height: 65px;
overflow: hidden;
}
.result__info {
position: absolute;
bottom: 4px;
color: #fff;
font-size: 0.8rem;
transition: all 150ms ease-in-out;
transform: translateY(200%);
opacity: 0;
}
.result__info.right {
right: 8px;
}
.result__info.left {
left: 8px;
}
.result__viewbox {
width: 100%;
height: 100%;
background: rgba(255, 255, 255, 0.08);
border-radius: 8px;
color: #fff;
text-align: center;
line-height: 65px;
}
.result #copy-btn {
position: absolute;
top: var(--y);
left: var(--x);
width: 38px;
height: 38px;
background: #fff;
border-radius: 50%;
opacity: 0;
transform: translate(-50%, -50%) scale(0);
transition: all 350ms cubic-bezier(0.175, 0.885, 0.32, 1.275);
cursor: pointer;
z-index: 2;
}
.result #copy-btn:active {
box-shadow: 0 0 0 200px rgba(255, 255, 255, 0.08);
}
.result:hover #copy-btn {
opacity: 1;
transform: translate(-50%, -50%) scale(1.35);
}
.field-title {
position: absolute;
top: -10px;
left: 8px;
transform: translateY(-50%);
font-weight: 800;
color: rgba(255, 255, 255, 0.5);
text-transform: uppercase;
font-size: 0.65rem;
pointer-events: none;
user-select: none;
}
.options {
width: 100%;
height: auto;
margin: 50px 0;
}
.range__slider {
position: relative;
width: 100%;
height: calc(65px - 10px);
display: flex;
justify-content: center;
align-items: center;
background: rgba(255, 255, 255, 0.08);
border-radius: 8px;
margin: 30px 0;
}
.range__slider::before, .range__slider::after {
position: absolute;
color: #fff;
font-size: 0.9rem;
font-weight: bold;
}
.range__slider::before {
content: attr(data-min);
left: 10px;
}
.range__slider::after {
content: attr(data-max);
right: 10px;
}
.range__slider .length__title::after {
content: attr(data-length);
position: absolute;
right: -16px;
font-variant-numeric: tabular-nums;
color: #fff;
}
#slider {
-webkit-appearance: none;
width: calc(100% - (70px));
height: 2px;
border-radius: 5px;
background: rgba(255, 255, 255, 0.314);
outline: none;
padding: 0;
margin: 0;
cursor: pointer;
}
#slider::-webkit-slider-thumb {
-webkit-appearance: none;
width: 20px;
height: 20px;
border-radius: 50%;
background: white;
cursor: pointer;
transition: all 0.15s ease-in-out;
}
#slider::-webkit-slider-thumb:hover {
background: #d4d4d4;
transform: scale(1.2);
}
#slider::-moz-range-thumb {
width: 20px;
height: 20px;
border: 0;
border-radius: 50%;
background: white;
cursor: pointer;
transition: background 0.15s ease-in-out;
}
#slider::-moz-range-thumb:hover {
background: #d4d4d4;
}
.settings {
position: relative;
height: auto;
widows: 100%;
display: flex;
flex-direction: column;
}
.settings .setting {
position: relative;
width: 100%;
height: calc(65px - 10px);
background: rgba(255, 255, 255, 0.08);
border-radius: 8px;
display: flex;
align-items: center;
padding: 10px 25px;
color: #fff;
margin-bottom: 8px;
}
.settings .setting input {
opacity: 1;
position: absolute;
width: 100%;
}
.settings .setting input + label {
user-select: none;
}
.settings .setting input + label::before, .settings .setting input + label::after {
content: "";
position: absolute;
transition: 150ms cubic-bezier(0.24, 0, 0.5, 1);
transform: translateY(-50%);
top: 50%;
right: 10px;
cursor: pointer;
}
.settings .setting input + label::before {
height: 30px;
width: 50px;
border-radius: 30px;
background: rgba(214, 214, 214, 0.434);
}
.settings .setting input + label::after {
height: 24px;
width: 24px;
border-radius: 60px;
right: 32px;
background: #fff;
}
.settings .setting input:checked + label:before {
background: #5d68e2;
transition: all 150ms cubic-bezier(0, 0, 0, 0.1);
}
.settings .setting input:checked + label:after {
right: 14px;
}
.settings .setting input:focus + label:before {
box-shadow: 0 0 0 2px rgba(255, 255, 255, 0.75);
}
.settings .setting input:disabled + label:before, .settings .setting input:disabled + label:after {
cursor: not-allowed;
}
.settings .setting input:disabled + label:before {
background: #4f4f6a;
}
.settings .setting input:disabled + label:after {
background: #909090;
}
.btn.generate {
user-select: none;
position: relative;
width: 100%;
height: 50px;
margin: 10px 0;
border-radius: 8px;
color: #fff;
border: none;
background-image: linear-gradient(135deg, #667eea 0%, #764ba2 100%);
letter-spacing: 1px;
font-weight: bold;
text-transform: uppercase;
cursor: pointer;
transition: all 150ms ease;
}
.btn.generate:active {
transform: translateY(-3%);
box-shadow: 0 4px 8px rgba(255, 255, 255, 0.08);
}
</style>
<div class="pagebody">
<div class="contr">
<h2 class="title">Password Generator</h2>
<div class="result">
<div class="result__title field-title">Generated Password</div>
<div class="result__info right">click to copy</div>
<div class="result__info left">copied</div>
<div class="result__viewbox" id="result">CLICK GENERATE</div>
<button id="copy-btn" style="--x: 0; --y: 0; opacity: 0; pointer-events: none;"><i class="far fa-copy"></i></button>
</div>
<div class="length range__slider" data-max="32" data-min="4">
<div class="length__title field-title" data-length="16">length:</div>
<input id="slider" max="32" style="background: linear-gradient(90deg, rgb(11, 30, 223) 42.8571%, rgba(255, 255, 255, 0.216) 42.9571%);" type="range" value="16" />
</div>
<div class="settings">
<span class="settings__title field-title">settings</span>
<div class="setting">
<input checked="" id="uppercase" type="checkbox" />
<label>Include Uppercase</label>
</div>
<div class="setting">
<input checked="" id="lowercase" type="checkbox" />
<label>Include Lowercase</label>
</div>
<div class="setting">
<input checked="" id="number" type="checkbox" />
<label>Include Numbers</label>
</div>
<div class="setting">
<input id="symbol" type="checkbox" />
<label>Include Symbols</label>
</div>
</div>
<button class="btn generate" id="generate">Generate Password</button>
</div>
<script src="https://cpwebassets.codepen.io/assets/common/stopExecutionOnTimeout-2c7831bb44f98c1391d6a4ffda0e1fd302503391ca806e7fcc7b9b87197aec26.js"></script>
<script>
// Clear the concole on every refresh
console.clear();
// set the body to full height
// document.body.style.height = `${innerHeight}px`
// Range Slider Properties.
// Fill : The trailing color that you see when you drag the slider.
// background : Default Range Slider Background
const sliderProps = {
fill: "#0B1EDF",
background: "rgba(255, 255, 255, 0.214)" };
// Selecting the Range Slider container which will effect the LENGTH property of the password.
const slider = document.querySelector(".range__slider");
// Text which will show the value of the range slider.
const sliderValue = document.querySelector(".length__title");
// Using Event Listener to apply the fill and also change the value of the text.
slider.querySelector("input").addEventListener("input", event => {
sliderValue.setAttribute("data-length", event.target.value);
applyFill(event.target);
});
// Selecting the range input and passing it in the applyFill func.
applyFill(slider.querySelector("input"));
// This function is responsible to create the trailing color and setting the fill.
function applyFill(slider) {
const percentage = 100 * (slider.value - slider.min) / (slider.max - slider.min);
const bg = `linear-gradient(90deg, ${sliderProps.fill} ${percentage}%, ${sliderProps.background} ${percentage +
0.1}%)`;
slider.style.background = bg;
sliderValue.setAttribute("data-length", slider.value);
}
// Object of all the function names that we will use to create random letters of password
const randomFunc = {
lower: getRandomLower,
upper: getRandomUpper,
number: getRandomNumber,
symbol: getRandomSymbol };
// Random more secure value
function secureMathRandom() {
return window.crypto.getRandomValues(new Uint32Array(1))[0] / (Math.pow(2, 32) - 1);
}
// Generator Functions
// All the functions that are responsible to return a random value taht we will use to create password.
function getRandomLower() {
return String.fromCharCode(Math.floor(Math.random() * 26) + 97);
}
function getRandomUpper() {
return String.fromCharCode(Math.floor(Math.random() * 26) + 65);
}
function getRandomNumber() {
return String.fromCharCode(Math.floor(secureMathRandom() * 10) + 48);
}
function getRandomSymbol() {
const symbols = '~!@#$%^&*()_+{}":?><;.,';
return symbols[Math.floor(Math.random() * symbols.length)];
}
// Selecting all the DOM Elements that are necessary -->
// The Viewbox where the result will be shown
const resultEl = document.getElementById("result");
// The input slider, will use to change the length of the password
const lengthEl = document.getElementById("slider");
// Checkboxes representing the options that is responsible to create differnt type of password based on user
const uppercaseEl = document.getElementById("uppercase");
const lowercaseEl = document.getElementById("lowercase");
const numberEl = document.getElementById("number");
const symbolEl = document.getElementById("symbol");
// Button to generate the password
const generateBtn = document.getElementById("generate");
// Button to copy the text
const copyBtn = document.getElementById("copy-btn");
// Result viewbox container
const resultContainer = document.querySelector(".result");
// Text info showed after generate button is clicked
const copyInfo = document.querySelector(".result__info.right");
// Text appear after copy button is clicked
const copiedInfo = document.querySelector(".result__info.left");
// if this variable is trye only then the copyBtn will appear, i.e. when the user first click generate the copyBth will interact.
let generatedPassword = false;
// Update Css Props of the COPY button
// Getting the bounds of the result viewbox container
let resultContainerBound = {
left: resultContainer.getBoundingClientRect().left,
top: resultContainer.getBoundingClientRect().top };
// This will update the position of the copy button based on mouse Position
resultContainer.addEventListener("mousemove", e => {
resultContainerBound = {
left: resultContainer.getBoundingClientRect().left,
top: resultContainer.getBoundingClientRect().top };
if (generatedPassword) {
copyBtn.style.opacity = '1';
copyBtn.style.pointerEvents = 'all';
copyBtn.style.setProperty("--x", `${e.x - resultContainerBound.left}px`);
copyBtn.style.setProperty("--y", `${e.y - resultContainerBound.top}px`);
} else {
copyBtn.style.opacity = '0';
copyBtn.style.pointerEvents = 'none';
}
});
window.addEventListener("resize", e => {
resultContainerBound = {
left: resultContainer.getBoundingClientRect().left,
top: resultContainer.getBoundingClientRect().top };
});
// Copy Password in clipboard
copyBtn.addEventListener("click", () => {
const textarea = document.createElement("textarea");
const password = resultEl.innerText;
if (!password || password == "CLICK GENERATE") {
return;
}
textarea.value = password;
document.body.appendChild(textarea);
textarea.select();
document.execCommand("copy");
textarea.remove();
copyInfo.style.transform = "translateY(200%)";
copyInfo.style.opacity = "0";
copiedInfo.style.transform = "translateY(0%)";
copiedInfo.style.opacity = "0.75";
});
// When Generate is clicked Password id generated.
generateBtn.addEventListener("click", () => {
const length = +lengthEl.value;
const hasLower = lowercaseEl.checked;
const hasUpper = uppercaseEl.checked;
const hasNumber = numberEl.checked;
const hasSymbol = symbolEl.checked;
generatedPassword = true;
resultEl.innerText = generatePassword(length, hasLower, hasUpper, hasNumber, hasSymbol);
copyInfo.style.transform = "translateY(0%)";
copyInfo.style.opacity = "0.75";
copiedInfo.style.transform = "translateY(200%)";
copiedInfo.style.opacity = "0";
});
// Function responsible to generate password and then returning it.
function generatePassword(length, lower, upper, number, symbol) {
let generatedPassword = "";
const typesCount = lower + upper + number + symbol;
const typesArr = [{ lower }, { upper }, { number }, { symbol }].filter(item => Object.values(item)[0]);
if (typesCount === 0) {
return "";
}
for (let i = 0; i < length; i++) {if (window.CP.shouldStopExecution(0)) break;
typesArr.forEach(type => {
const funcName = Object.keys(type)[0];
generatedPassword += randomFunc[funcName]();
});
}window.CP.exitedLoop(0);
return generatedPassword.slice(0, length).
split('').sort(() => Math.random() - 0.5).
join('');
}
// function that handles the checkboxes state, so at least one needs to be selected. The last checkbox will be disabled.
function disableOnlyCheckbox() {
let totalChecked = [uppercaseEl, lowercaseEl, numberEl, symbolEl].filter(el => el.checked);
totalChecked.forEach(el => {
if (totalChecked.length == 1) {
el.disabled = true;
} else {
el.disabled = false;
}
});
}
[uppercaseEl, lowercaseEl, numberEl, symbolEl].forEach(el => {
el.addEventListener('click', () => {
disableOnlyCheckbox();
});
});
</script>
</div>
That's it! You've successfully created a Password Generator Tool on Blogger.
Before diving into the implementation, it's essential to have a basic understanding of HTML, CSS, and JavaScript. We'll provide a brief overview of these technologies, explaining their roles in web development.
Here, we'll walk you through the process of setting up a new project on Blogger. We'll cover the necessary steps, including creating a new blog, selecting a template, and accessing the HTML editor.
In this section, we'll start building the password generator by creating the HTML structure. We'll define the necessary elements such as input fields, buttons, and containers to hold the generated passwords.
To make our password generator visually appealing, we'll apply CSS styles to the HTML elements created in the previous section. We'll discuss techniques for selecting elements, applying styles, and ensuring the generator's responsiveness.
Now, it's time to add functionality to our password generator. We'll use JavaScript to generate random passwords based on user-defined criteria. We'll cover topics such as generating random characters, combining different character sets, and ensuring password strength.
To enhance user experience, we'll incorporate additional features such as password length control, the ability to include special characters, and the option to generate multiple passwords at once. We'll demonstrate how to capture user input and modify the password generation logic accordingly.
In this section, we'll discuss the importance of testing our password generator to ensure its functionality and reliability. We'll explore various testing scenarios and provide tips for debugging and refining the code.
Once we're satisfied with the password generator's performance, we'll guide you through the process of publishing it on Blogger. We'll explain how to embed the HTML, CSS, and JavaScript code into your blog and make it accessible to your readers.
In this section, we'll share some valuable tips for improving the functionality and security of your password generator. We'll cover techniques such as adding additional validation, implementing encryption, and incorporating password strength meters.
Creating a password generator using HTML, CSS, and JavaScript is an excellent way to automate the process of generating strong and secure passwords. In this article, we provided a step-by-step guide on building a password generator on Blogger. By following the outlined steps and incorporating the suggested tips, you can create a valuable tool that enhances your online security.
Q1. Can I use the password generator on platforms other than Blogger?
Yes, absolutely! The password generator we built in this article can be used on any website or platform that supports HTML, CSS, and JavaScript.
Q2. Can I customize the password generation logic?
Certainly! Our password generator allows customization options such as password length, inclusion of special characters, and generating multiple passwords at once. You can modify the code to suit your specific requirements.
Q3. Is the password generator secure?
While the password generator provides a convenient way to generate passwords, it's important to remember that the security of the generated passwords depends on the implementation and user practices. Follow best security practices, such as regularly changing passwords and using unique combinations.
Q4. Can I add additional features to the password generator?
Absolutely! Our article provides a foundation for building a basic password generator. You can expand its functionality by adding features like password history, password saving, or integrating with password managers.
Q5. Are there any alternatives to Blogger for hosting the password generator?
Yes, there are several alternatives to Blogger for hosting your password generator. You can consider platforms like WordPress, Wix, or hosting it on your own domain using a web hosting service.


Are you looking to create an age calculator web app tool for your Blogger page? Building an age calculator can be a useful addition to your website, allowing visitors to determine their age quickly. In this article, we'll guide you through the process of creating an age calculator web app tool using HTML, CSS, and JavaScript. So, let's get started!
Introduce the concept of an age calculator web app tool and its benefits. Explain how it can be a valuable feature for websites, providing users with a convenient way to calculate their age.
Dubble Click To Copy Code
<style>
@import url('https://fonts.googleapis.com/css2?family=Poppins:ital,wght@1,300&display=swap');

* {
    font-family: 'Poppins', sans-serif;
}

body {
    background-color: #111827;
    color: white;
    display: flex;
    align-items: center;
    justify-content: center;
}

.calculator-form {
    display: flex;
    flex-direction: column;
    align-items: center;
    border: 2px solid deepskyblue;
    padding: 48px;
    border-radius: 20px;
}

.inputs {
    display: flex;
}

.block {
    display: flex;
    flex-direction: column;
    margin: 0 8px;
}

label {
    font-size: 18px;
}

.input {
    border: 2px solid deepskyblue;
    height: 3rem;
    width: 8rem;
    border-radius: 7px;
    padding: 8px;
    margin-top: 4px;
    outline: none;
}

.submit {
    height: 3rem;
    width: 8rem;
    border: 2px solid deepskyblue;
    background: deepskyblue;
    color: white;
    font-size: 16px;
    border-radius: 7px;
    padding: 8px;
    margin-top: 30px;
}
</style>

<div class="calculator-form">
    <h1>Age Calculator</h1>
    <div class="inputs">
        <div class="block">
            <label for="date">Date</label>
            <input type="number" max="31" id="date" class="input" placeholder="DD">
        </div>
        <div class="block">
            <label for="month">Month</label>
            <input type="number" max="12" id="month" class="input" placeholder="MM">
        </div>
        <div class="block">
            <label for="year">Year</label>
            <input type="number" id="year" class="input" placeholder="YYYY">
        </div>
    </div>
    <button type="submit" class="submit" onclick="calculateAge()">Submit</button>

    <p id="displayAge"></p>
</div>

<script>
const calculateAge = () => {
  let d1 = document.getElementById("date").value;
  let m1 = document.getElementById("month").value;
  let y1 = document.getElementById("year").value;

  let date = new Date();
  let d2 = date.getDate();
  let m2 = 1 + date.getMonth();
  let y2 = date.getFullYear();
  let month = [31, 28, 31, 30, 31, 30, 31, 31, 30, 31, 30, 31];

  if (d1 > d2) {
    d2 = d2 + month[m2 - 1];
    m2 = m2 - 1;
  }

  if (m1 > m2) {
    m2 = m2 + 12;
    y2 = y2 - 1;
  }

  let d = d2 - d1;
  let m = m2 - m1;
  let y = y2 - y1;

  document.getElementById("displayAge").innerHTML = `Your Age is ${y} Years, ${m} Months and ${d} Days`;
};
</script>
Explain the functionality of an age calculator and how it works. Highlight the key components involved, such as input fields for date of birth, a calculate button, and the display area for the age calculation result.
Provide a brief overview of setting up a Blogger page. Explain the steps involved in creating a new Blogger page or selecting an existing page to add the age calculator web app tool.
Explain the process of creating the HTML structure for the age calculator web app tool. Describe the necessary HTML elements and their attributes, including input fields, buttons, and result display area.
Guide the reader through the process of adding CSS styling to the age calculator web app tool. Emphasize the importance of visually appealing design and provide CSS code snippets for styling the different elements.
Explain the role of JavaScript in making the age calculator web app tool functional. Walk the reader through the process of adding JavaScript code to handle the age calculation based on the user's input.
Detail the JavaScript code needed to calculate the age based on the user's input. Explain the logic behind the calculation, considering factors such as the current date and the user's provided date of birth.
Describe how to display the calculated age on the web app tool. Provide guidance on updating the HTML element responsible for displaying the result with the calculated age.
Suggest ways to enhance the user experience of the age calculator web app tool. Discuss potential improvements, such as adding error handling for invalid inputs or providing additional information related to age calculation.
Highlight the importance of testing and debugging the age calculator web app tool. Provide tips and techniques for ensuring the tool functions correctly and handling any potential issues.
Guide the reader through the process of publishing the age calculator web app tool on their Blogger page. Explain how to embed the HTML, CSS, and JavaScript code within the Blogger editor.
Suggest ways to promote and customize the age calculator web app tool. Discuss strategies for attracting visitors to use the tool and offer suggestions for personalization, such as changing the colors or layout.
Summarize the process of creating an age calculator web app tool on a Blogger page using HTML, CSS, and JavaScript. Highlight the benefits of having this tool and encourage readers to implement it on their own websites.
Can I customize the appearance of the age calculator?
Is JavaScript necessary for the age calculator to work?
Can I embed the age calculator on multiple pages of my Blogger site?
How accurate is the age calculation?
Can I add additional features to the age calculator?


<div class='safelink_wrapper'>
<div class='safelink_content'>
<div class='safelink_generate_input'>
<input autocomplete='off' id='generateurl' oninvalid='this.setCustomValidity('Please Enter valid link')' placeholder='Masukkan tautan Anda di sini' required='required' type='url'/>
<button class='gmp_button unelevated' id='btngenerate' oninvalid='this.setCustomValidity('Please Enter valid link')' type='button'>
<svg fill="none" stroke="currentColor" stroke-linecap="round" stroke-linejoin="round" stroke-width="1" viewBox="0 0 24 24" xmlns="http://www.w3.org/2000/svg">
<path d="m16 18 6-6-6-6"></path>
<path d="m8 6-6 6 6 6"></path>
</svg>
Generate URL
</button>
</div>
<div class='hidden' id='generateloading'>
<div class='safelink_loading'>
<svg viewBox='0 0 50 50' x='0px' y='0px'>
<path d='M25.251,6.461c-10.318,0-18.683,8.365-18.683,18.683h4.068c0-8.071,6.543-14.615,14.615-14.615V6.461z'>
<animateTransform attributeName='transform' attributeType='xml' dur='0.6s' from='0 25 25' repeatCount='indefinite' to='360 25 25' type='rotate'/>
</path>
</svg>
Mohon tunggu sebentar...
</div>
</div>
<div class='hidden' id='generatelink'>
<div class='safelink_output'>
<input id='resulturl' onclick='this.focus();this.select()' readonly='readonly' type='text'/>
<button class='copytoclipboard gmp_button unelevated' data-clipboard-action='copy' data-clipboard-target='#resulturl' id='copytoclipboard'>Salin URL</button>
</div>
</div>
</div>
</div>

.png "Blogger Responsive Template")
| Name | Value |
|---|---|
| Name | Tollyflix Blogger Movie Template |
| Version | Premium Paid |
| Style | Grid |
| Color | Dark |
| Video Player | Added |
| Mobile Friendly | Yes |
| Fast Loading | 100% |
| Designer | Mian Saab |
| URL | https://thesquadhub.blogspot.com/ |
| Publisher | https://thesquadhub.blogspot.com/ |

.png)


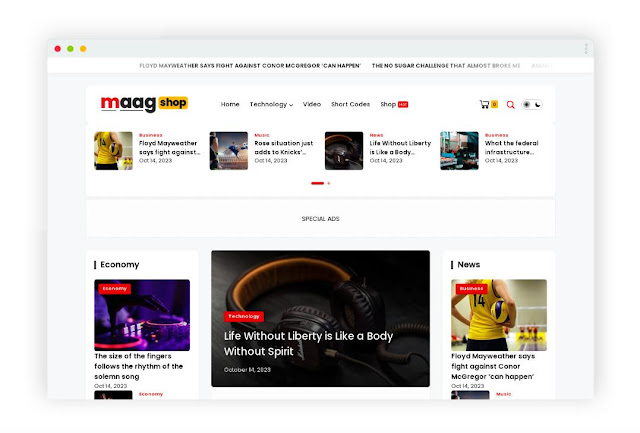
Download Link Soon


  <style>
  /*! SafeLink Generator CSS */
  .hidden{display:none !important}
  button{cursor:pointer}
  button:hover{opacity:.9}
</style>

<h2>Safelink</h2>
<!--[ SafeLink ]-->
<div class='cArea'>
  <label>
    <input class='cInpt' id='safeIn' name='' type='text' />
    <span class='n req'>Enter Link here</span>
  </label>
</div>
<div class='cArea'>
  <label>
    <input class='cInpt' id='safeOut' name='' type='text' readonly />
    <span class='n'>Protected Link</span>
  </label>
</div>
<div class='cArea'>
  <button class='button' id='safeGen'>Protect Link</button>
  <button class='button hidden' id='safeCpy'>Copy</button>
  <button class='button hidden' id='safeViw'>View</button>
</div>

<!--[ Safelink ]-->
<script>
  /*<![CDATA[*/
  /* SafeLink settings */
  var safeSet = {
    safePar: "#?url",
    succNtf: "<i class='check'></i>Link Protected, Click on Copy",
    entrNtf: "<i class='warn'></i>Enter link to protect!",
    cpydNtf: "<i class='clipboard'></i>Copied to clipboard!",
  };
  /* SafeLink scripts by Tech and Fun Zone*/
  function _0x4b5f(){var t=["nJi2mJq1mLfgEhzRvW","C2fMzuLU","ywrKrxzLBNrmAxn0zw5LCG","C2v0qxr0CMLIDxrL","mJqZmtq3nNfhvxHuBa","C2fMzunWEq","Ahr0Chm6lY8","mtaXody0u0DArgD0","x2jSyw5R","mtbnzfrwzve","C2fMzvzPDW","zw5J","y29WEq","y3b5ze50zG","ngT4zfHNvW","Ahr0CdOVlW","zxHLy0nVBw1HBMq","CMvTB3zLqwXSuMfUz2vZ","BgvUz3rO","C2fMzvbHCG","lNDPzgDLDcbPBNb1DfT0ExbLpxrLEhrDlcaUD2LKz2v0igLUChv0w3r5Cgu9zw1HAwXDlcaUD2LKz2v0ihrLEhrHCMvH","AgLKzgvU","mJKXmZCXnZzTB3bishO","otG2otrkEMTeuwK","DMfSDwu","C2fMzu91Da","mtCZotq1mu13whzbtG","Aw5WDxq","mZqYnZK1mfHIsMPbwa","y2XPy2S","Aw5KzxHpzG","zgf0ys10zxH0","B3bLBG","C2fMzuDLBG","B25JBgLJAW"];return(_0x4b5f=function(){return t})()}function _0x227a(a,t){var u=_0x4b5f();return(_0x227a=function(t,n){var r=u[t=+t];void 0===_0x227a.AFejpy&&(_0x227a.UIWYON=function(t){for(var n,r,e="",f="",a=0,u=0;r=t.charAt(u++);~r&&(n=a%4?64*n+r:r,a++%4)&&(e+=String.fromCharCode(255&n>>(-2*a&6))))r="abcdefghijklmnopqrstuvwxyzABCDEFGHIJKLMNOPQRSTUVWXYZ0123456789+/=".indexOf(r);for(var i=0,o=e.length;i<o;i++)f+="%"+("00"+e.charCodeAt(i).toString(16)).slice(-2);return decodeURIComponent(f)},a=arguments,_0x227a.AFejpy=!0);var e=u[0],f=t+e,e=a[f];return e?r=e:(r=_0x227a.UIWYON(r),a[f]=r),r})(a,t)}(function(){function t(t,n){return _0x227a(t-811,n)}var n=_0x4b5f();function r(t,n){return _0x227a(t- -794,n)}for(;;)try{if(681338==+parseInt(r(-783,-783))+parseInt(t(838,831))/2+-parseInt(t(825,821))/3*(-parseInt(r(-792,-805))/4)+parseInt(r(-762,-759))/5*(parseInt(t(827,834))/6)+parseInt(r(-771,-775))/7+-parseInt(r(-764,-781))/8+-parseInt(r(-784,-787))/9)break;n.push(n.shift())}catch(t){n.push(n.shift())}})(),function(){for(var t=qSell(o(70,75)),n=0;n<t[r(-595,-587)];n++)t[n][o(87,89)](r(-566,-578),function(){var t=this[n(-683,-678)]?"fl":"nfl";function n(t,n){return _0x227a(n- -690,t)}this[n(-647,-664)]("data-text",t)});function r(t,n){return _0x227a(n- -593,t)}var f=getid(r(-581,-569)),a=getid(r(-592,-580)),e=getid(o(83,73)),u=getid(o(90,106)),i=getid(r(-565,-560));function o(t,n){return _0x227a(t-62,n)}f.addEventListener("blur",function(){var t=f[r(-575,-561)];function n(t,n){return _0x227a(n- -586,t)}function r(t,n){return _0x227a(n- -573,t)}return~t.indexOf(n(-568,-557))||~t[n(-578,-568)](r(-556,-570))||""==t||(t="https://"+t),f[r(-548,-561)]=t,f}),e.addEventListener("click",function(){function t(t,n){return _0x227a(t- -369,n)}var n,r;function e(t,n){return _0x227a(t- -344,n)}""!=f[e(-332,-342)]?(n=b64[t(-335,-346)](f[t(-357,-368)]),r=blogUrl+safeSet[t(-362,-376)]+"="+n,a[t(-357,-350)]=r,a[e(-318,-305)](e(-325,-340),"fl"),i[t(-347,-364)]=function(){window[_0x227a(20,610)](r,_0x227a(31,1029))},remCt(u,"hidden"),remCt(i,e(-335,-330)),toastNotif(safeSet.succNtf)):toastNotif(safeSet.entrNtf)}),u[o(87,100)](r(-590,-576),function(){function t(t,n){return _0x227a(t-791,n)}function n(t,n){return _0x227a(t- -873,n)}a[t(803,819)];var r=getSelection();r[n(-868,-857)](),a.select(),document[n(-869,-885)](t(791,804)),r[t(796,788)](),toastNotif(safeSet[t(792,783)])})}();
  /*]]>*/
</script>
Your Blogger blog will now be using the Lantro UI Safelink Premium Blogger Template. You can customize the template to your liking by editing the template's CSS and HTML files.


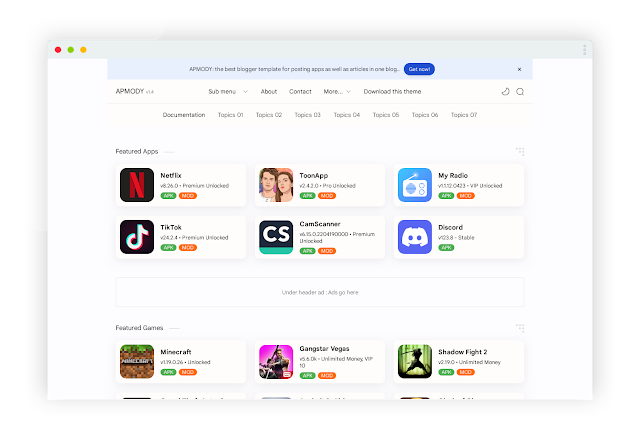
Are you a blogger looking to elevate the design and functionality of your website? Look no further! In this article, we're excited to introduce you to the Mini Apk Premium Pro Blogger Template by TheSquadHub. Whether you're a seasoned blogger or just starting, having an eye-catching and efficient website is essential to captivate your audience. Let's delve into the details of this fantastic template that's available for free! Creating a visually appealing and user-friendly blog layout can be quite challenging, especially if you're not a web design expert. This is where the Mini Apk Premium Pro Blogger Template comes to the rescue. This template is designed by idntheme to cater to the needs of bloggers who want a professional-looking website without the hassle of complex coding.
![Download Mini Apk Premium Pro Blogger Template [Free] TheSquadHub](https://blogger.googleusercontent.com/img/b/R29vZ2xl/AVvXsEj61pFXpP2fmqvHgof7QKYB6NovMUI_JrNbFzWShKEaPhfh8nADYFjEQ2sE3B5n-m7OOcQTqo44f3NsNKmE4Xh_qiXQk7Cjp_paJPicXptHi1UU2rj55Gzyqpe4Qv0O1wjys0v7W3Z1Nmd-/w1600/Mini+APK+Responsive+Blogger+Theme.png)
![Apmody Premium Blogger Template 1.4 [Free] 100% Working](https://blogger.googleusercontent.com/img/a/AVvXsEjFMWiuYd2SwhakO3eAJQj_rJBwyOPGiMRgKfEJEDfObAy6Q2WoUWAxjAv0Ry2cVSeW9_a_j1ChQyoI0mbpXxXga0oDfhgjTkgzhVnMnM88FG1G5QNv5nd0zgXFD8pPUW49q-_CKvjRdn82c1i6GIbTDTw-9NcPrdxN9L3H3VqBfNVSCYRCj9DJuWn9xig=w1600)

